
Google offers a variety of services with APIs that enable the creation of advanced web applications. All APIs offered by Google are easy to use and highly functional. Among them, Google Calendar API offers the best functionality as a calendar API.
Django, on the other hand, has one of the largest user bases of any web framework, but there are surprisingly few tutorials on the Internet on how to use the Google Calendar API with Django.
To integrate Django with the Google Calendar API, you generally need a service‑to‑service approach using a Service Account (not a user‑to‑service flow)—a crucial detail that few tutorials cover and many beginners miss, leading to roadblocks. Mastering this unlocks practical apps like scheduling and booking systems, so it’s well worth getting right.
In this article, I'll explain how to integrate Django and Google Calendar API by creating a simple Django application, focusing on the key points to watch out for—particularly the critical use of Service Accounts.
Application Structure
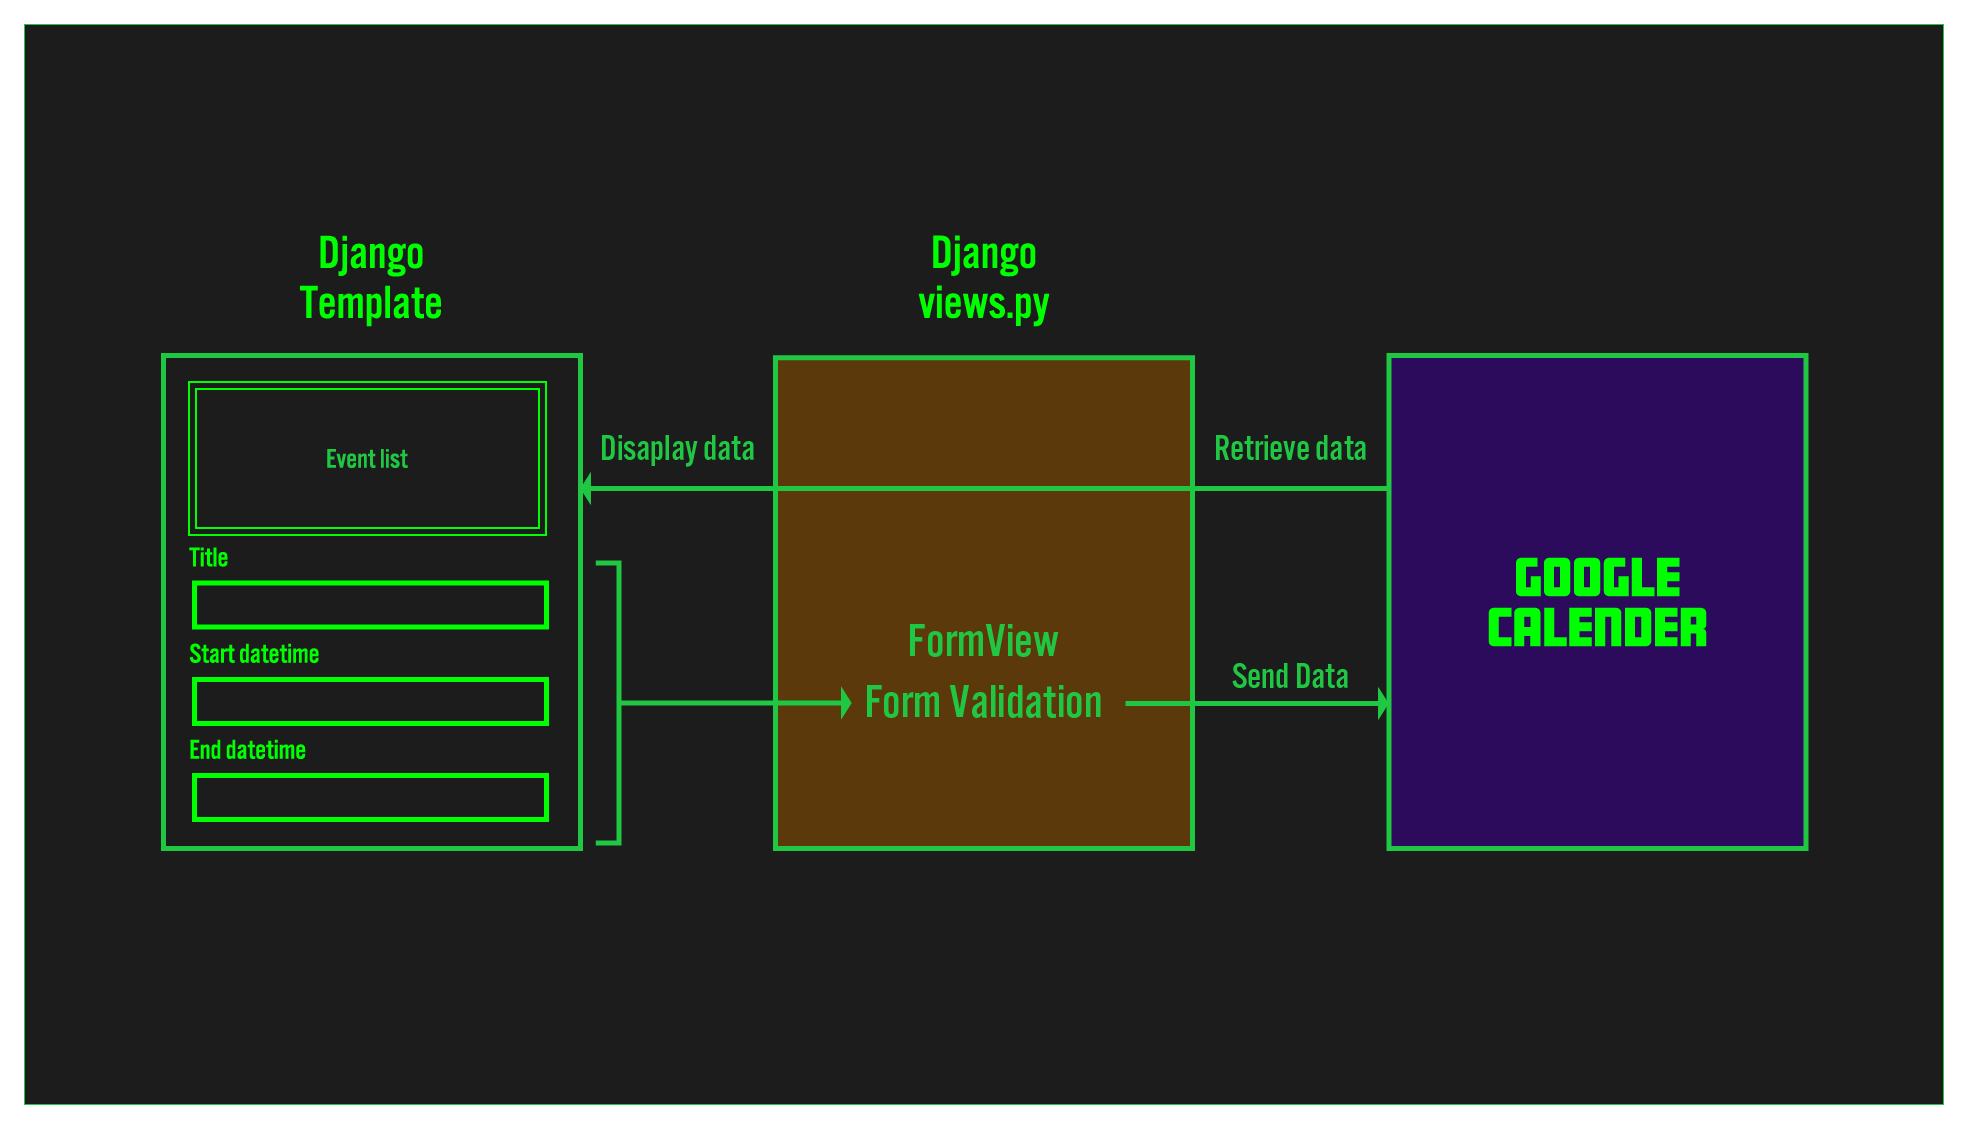
Here's how this application works:
Users input an event name, start date and time, and end date and time into a form.
This data is then sent to and registered on Google Calendar. Simultaneously, the application fetches and displays existing events from Google Calendar.
It's important to note that the data is stored *only* in Google Calendar, not in the Django database.
Therefore, we won't be creating any models for this application.
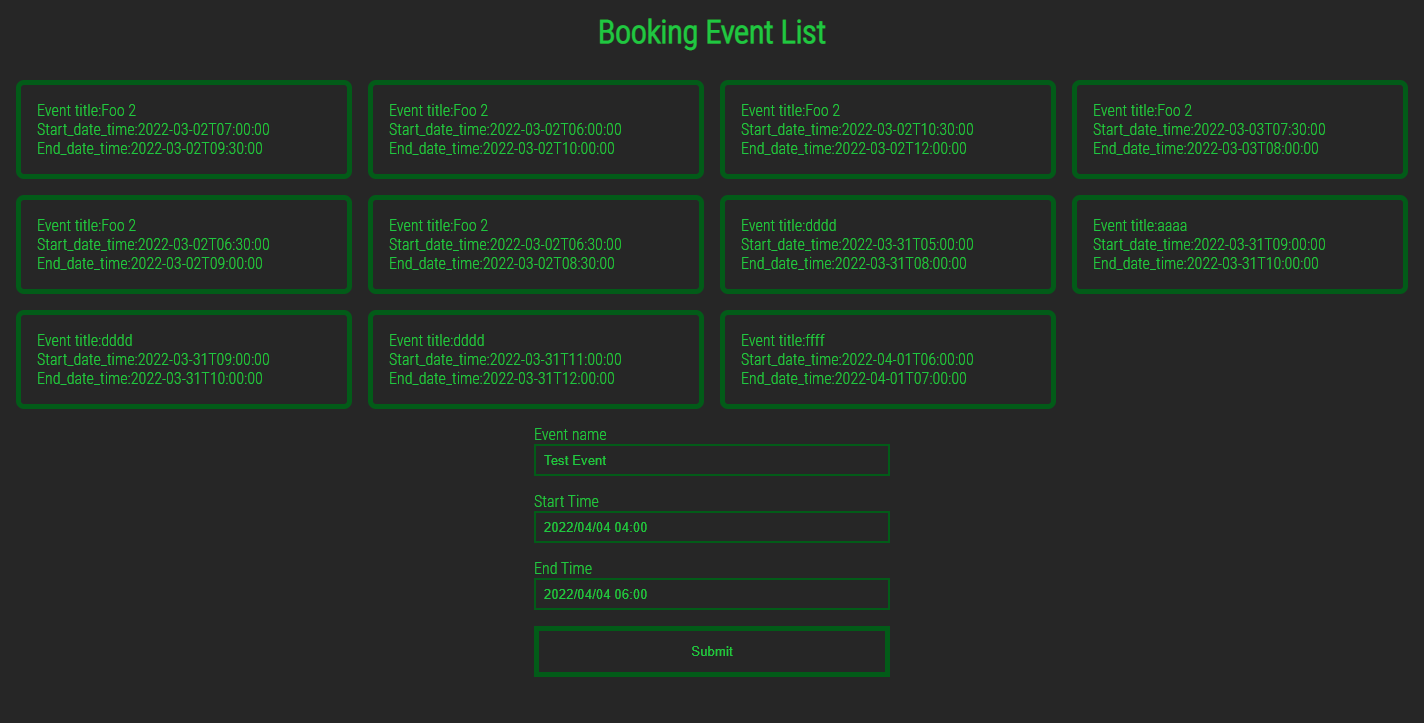
The template has the following design:
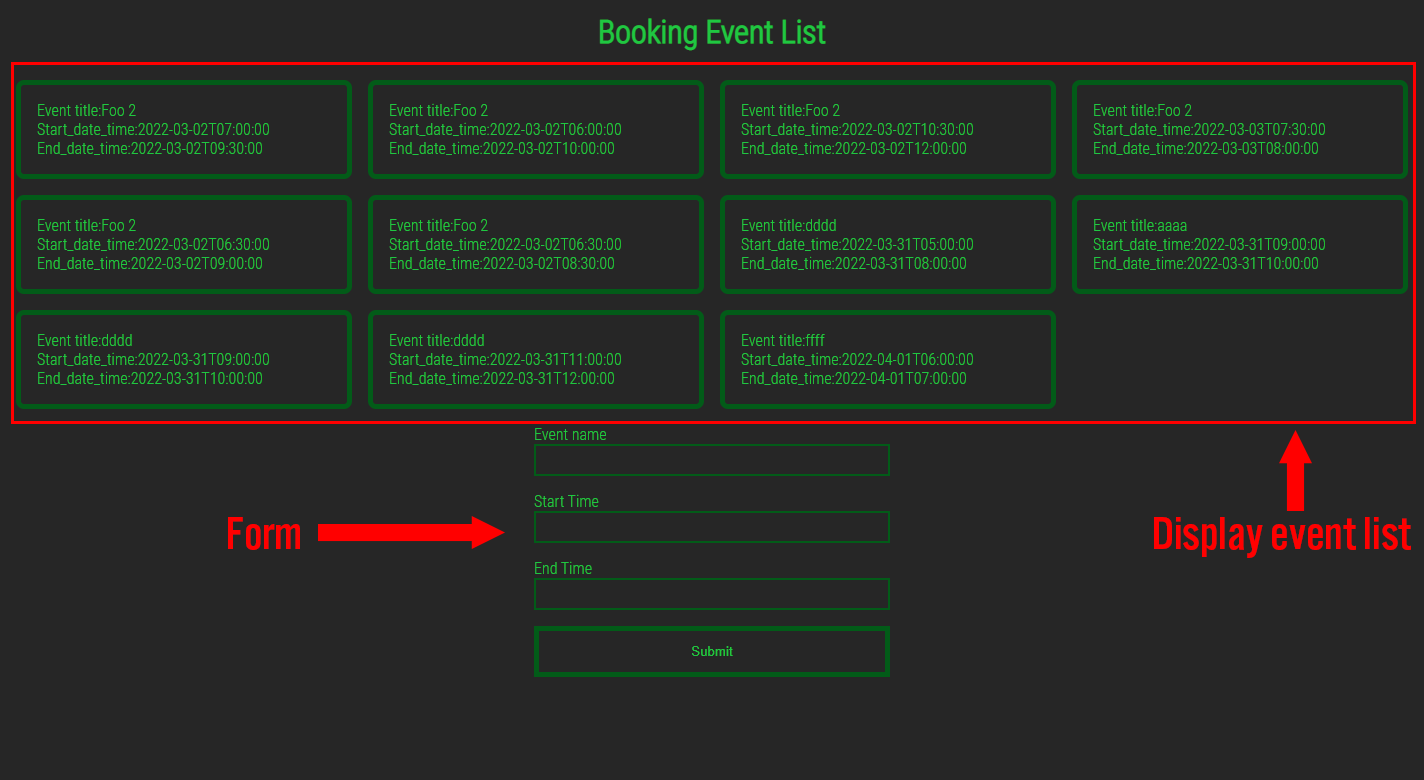
The top half displays the title, start time, and end time of past events retrieved from Google Calendar.
The bottom half contains a form. When data is entered into this form, it's sent to Google Calendar, and the newly created event will then be displayed in the top half.
Development Process
To use this application, the first step is to access the GCP (Google Cloud Platform) administration screen and obtain a credential file to communicate with the Google API.
We'll develop this application in the following order:
- 1. Creating a Google API service account
- 2. Creating a new calendar with Google calendar
- 3. Completing basic Django setup
- 4. Creating the first view
- 5. Creating a Form
- 6. Writing Google API settings in
views.py - 7. Creating a POST Method in
views.py - 8. Retrieving Data from Google Calendar
- 9. Customizing the Design with CSS
So let's get started!
1. Creating a Google API service account
Getting a GCP Service Account is essential for this application. The Service Account makes this integration possible.
This is the key point that many developers miss: To connect a Django application and the Google Calendar API, you need a Service Account within GCP, not a regular GCP user account. Many developers attempt to connect a user account to the calendar and fail repeatedly.
Once you obtain the Service Account, the rest of the implementation is straightforward.
How to create a service account
This article includes many screenshots of the administration screen.
Note that the screen and menu options may have changed since these screenshots were taken. I will update the article accordingly if I notice any changes in the GCP admin screen.
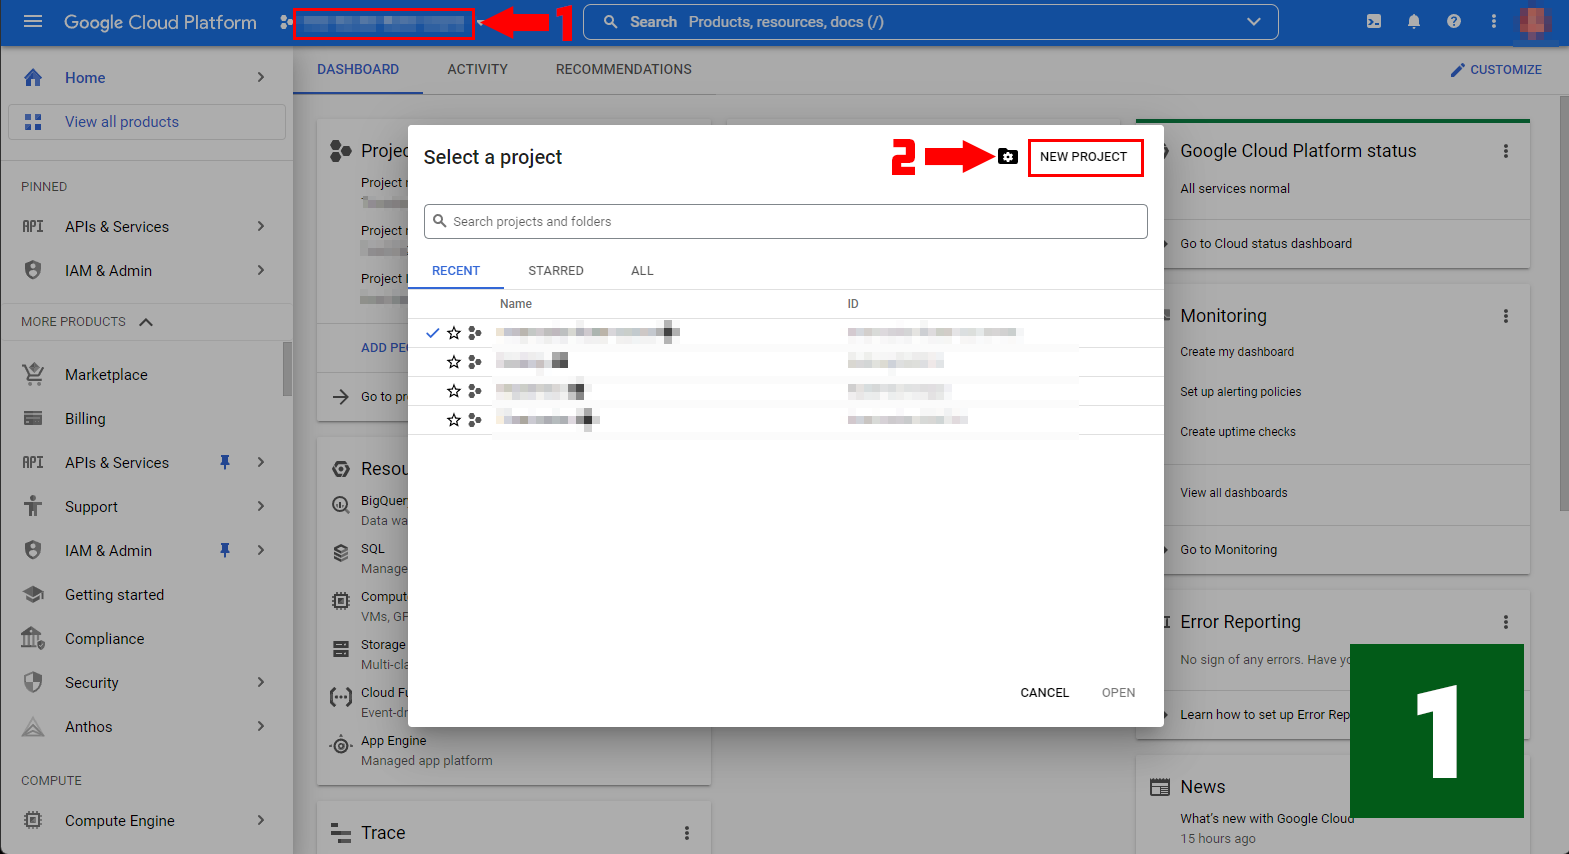
- The first step in using the Google API is to create a project. Click on the red frame above, enter a project name, and then create it.
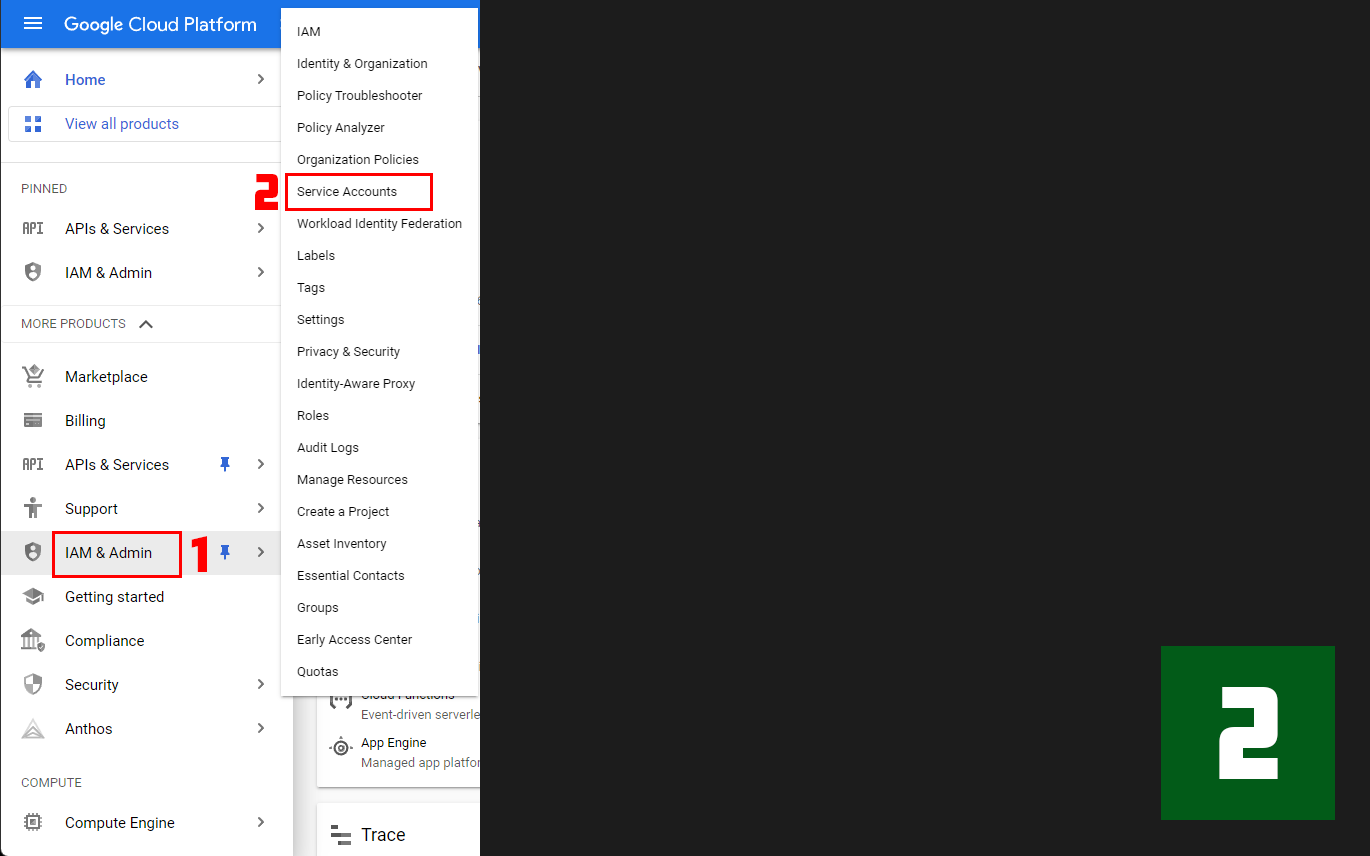
- After creating the project, select "IAM & ADMIN" from the Sidebar menu, and then choose "Service Account".
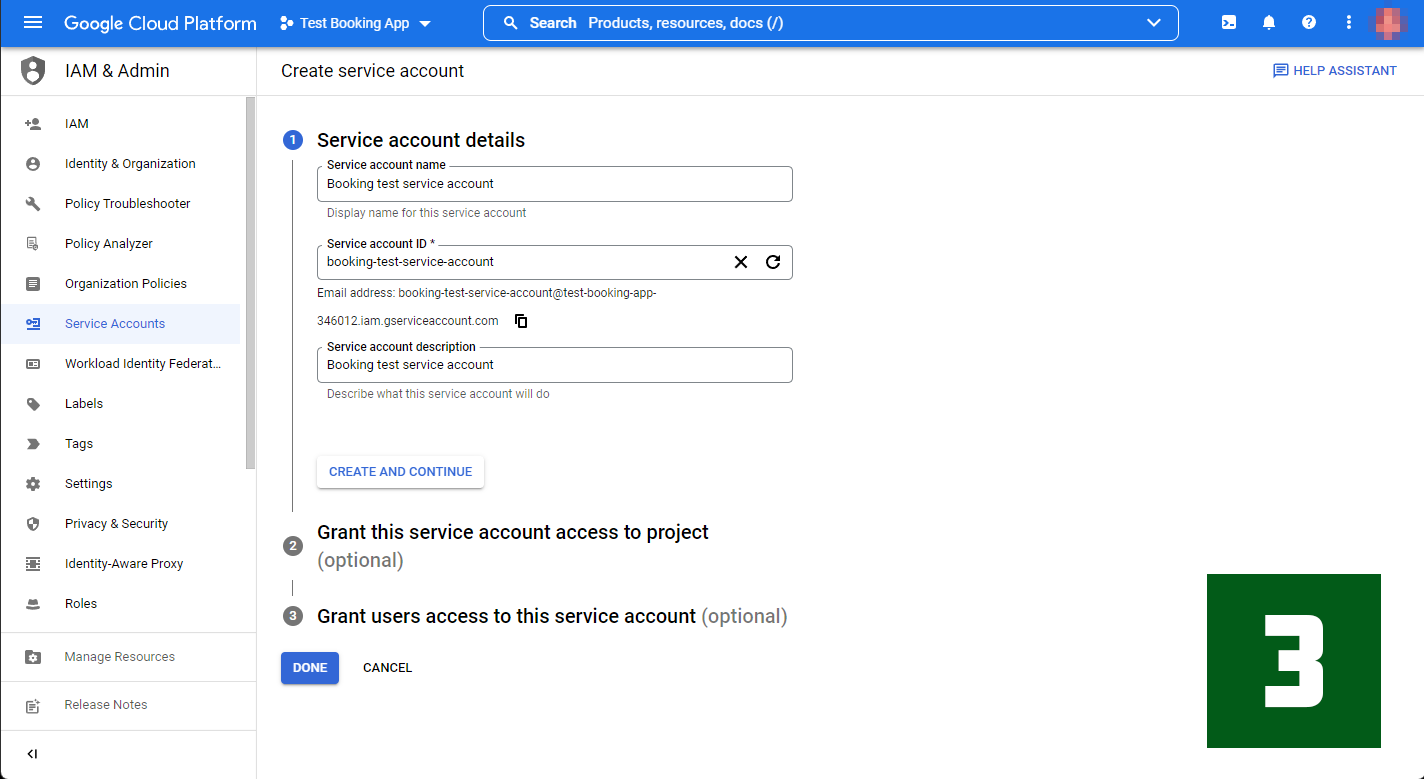
- After selecting the service account, add the account service name and description.
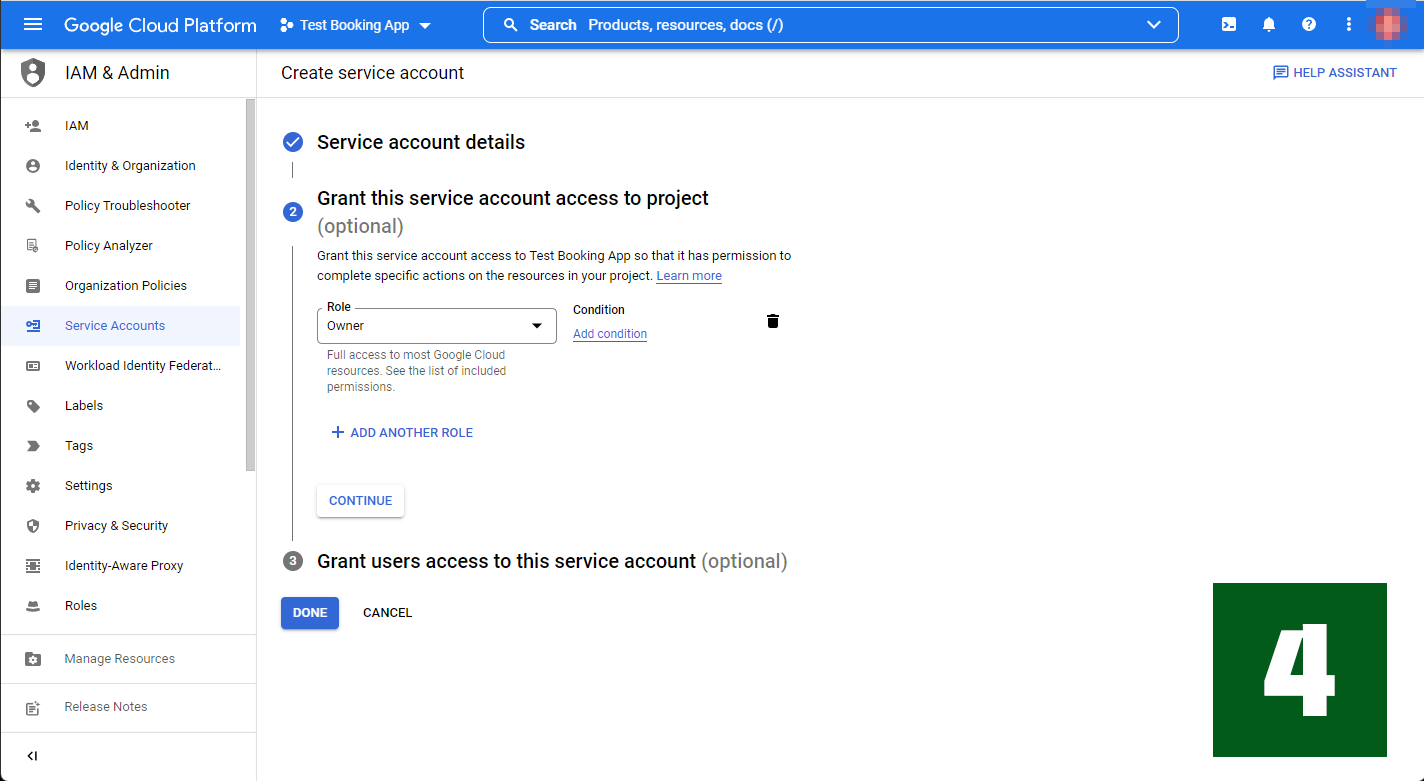
- During the development stage, you have the option to select "owner".
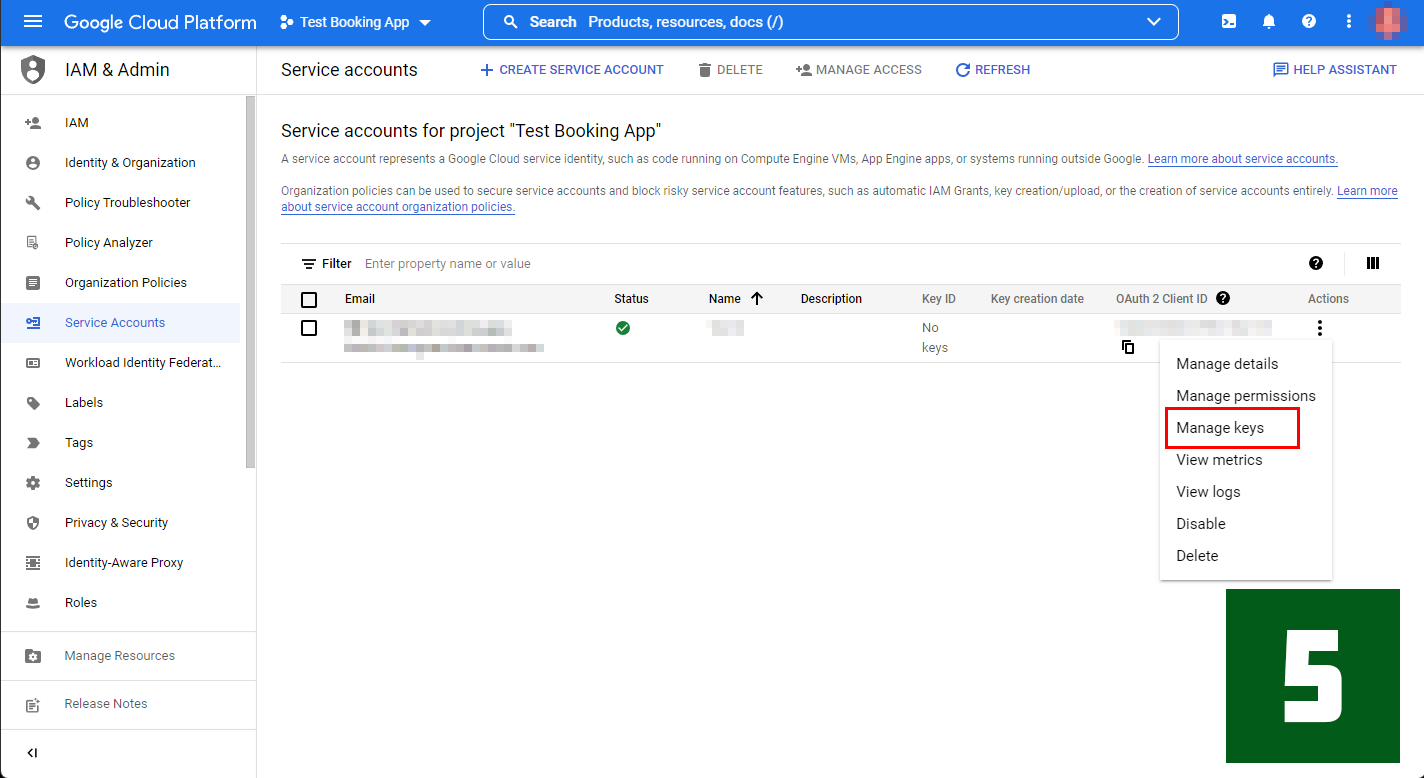
- Now that we have a service account, we need to create a Key. Click on the part of the red frame to do so.
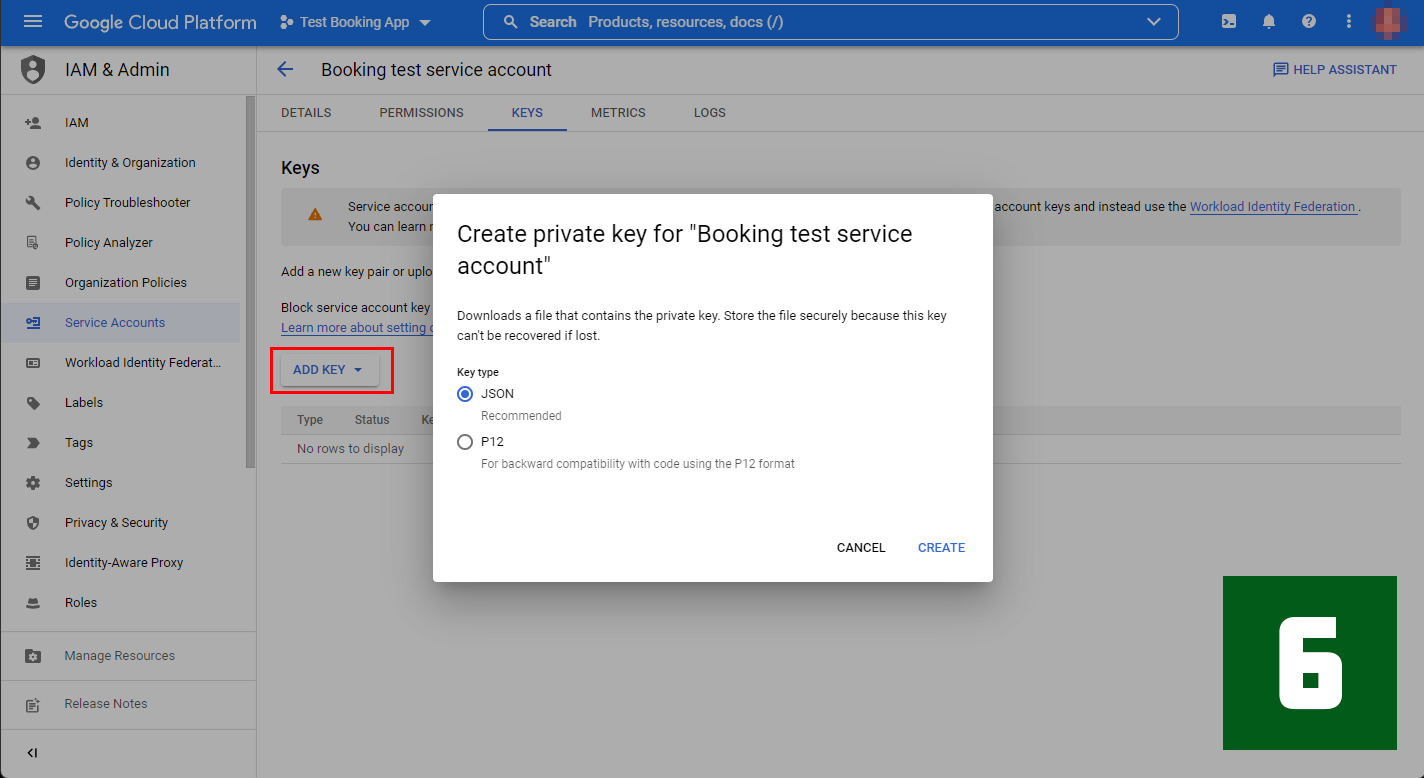
- On the next screen, click the red frame and select "JSON". This will download the credential file to your local computer.
Place this JSON file at the root of your project. This is an important point to note.
For this particular project, I have named it "book" and created an application called "cal".
The overall file structure of the project is as follows.

2. Creating a new calendar with Google calendar
To create a new calendar in Google Calendar:
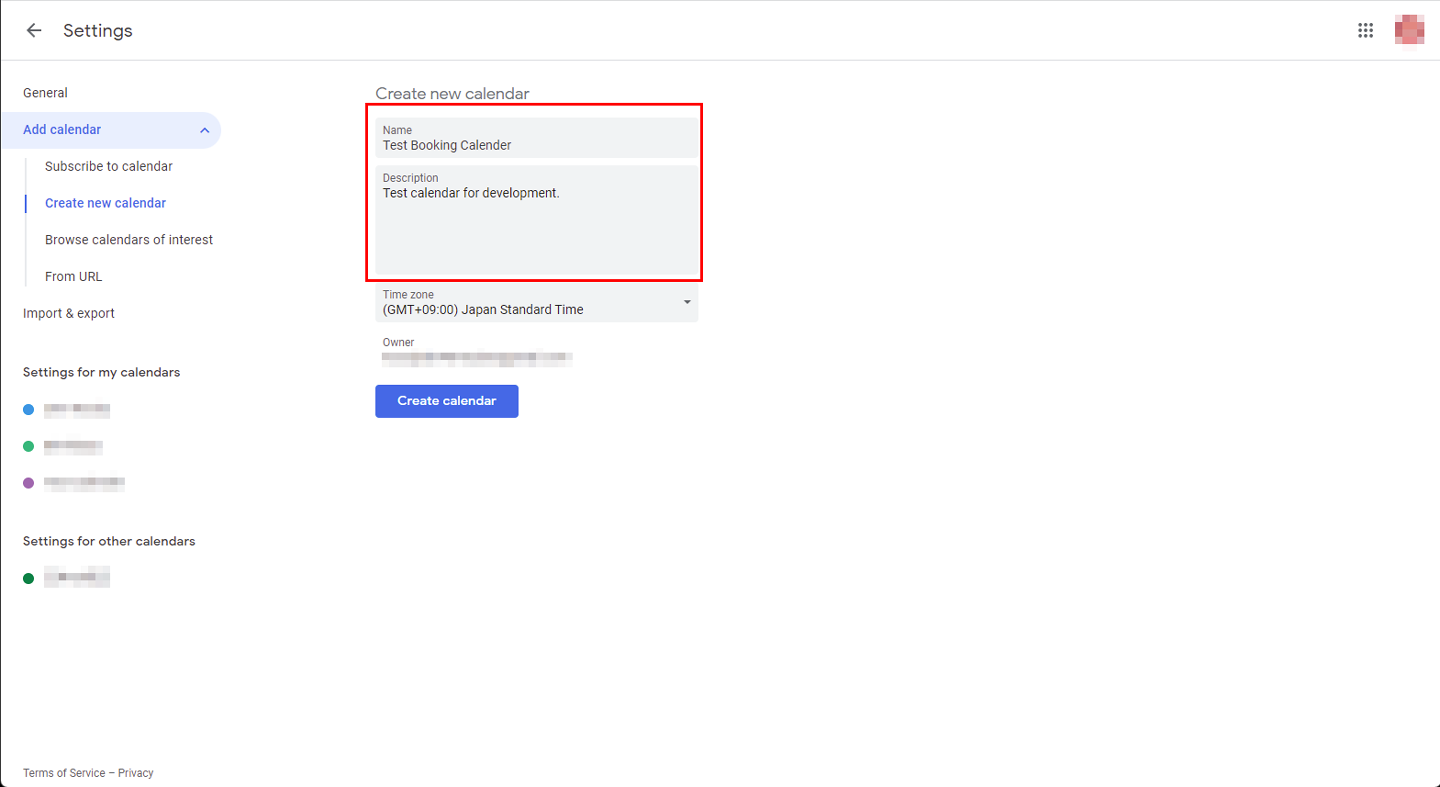
1. From the top page of Google Calendar, click the `+` mark in "Other calendars" and select "Create a new calendar".
2. Write the name and description of the new calendar.
3. Click "Create calendar" to finish creating the calendar.
After creating the calendar, you'll need to find its CalendarID. To do this, select "Settings for my calendar" from the menu on the left side, and confirm the CalendarID.


3. Completing basic Django setup
Set up a basic Django project and application.
See this article for how to do a basic Django setup with Docker. This time, proceed until step No.9 in that article.
Note that we won't create any models for this project.
Django packages
The package to be used this time is listed in the accompanying list.
django
psycopg2-binary
django-environ
django-widget-tweaks
google-api-python-client
This project requires the installation of two packages: django-widget-tweaks and google-api-python-client.
django-widget-tweaks is a useful Django package that allows developers to easily customize form field rendering in Django templates.
django-widget-tweaks needs to be registered in INSTALLED_APPS in settings.py:
In addition, I am including a package called google-api-python-client. With this, you can call the Google API function.
settings.py
INSTALLED_APPS = [
    ...
    'widget_tweaks'
]
Frontend Dependencies and Libraries
For the frontend development, we will use a date-picker in the template to register the start and end times of the event. Although FullCalendar was considered for the date picker, it seemed too complicated. Instead, we will use jQuery's Datetimepicker. This package is effortless if you want to pick up the date and time.
4. Creating the first view
Here's the first view:
For the view, create a view that inherits from FormView.
Since we haven't created BookingForm yet, you'll see an error when you run it. However, ignore this error for now.
cal/views.py
from django.views.generic import FormView
from cal.forms import BookingForm

class HomeView(FormView):
    form_class = BookingForm
    template_name = 'cal/home.html'
5. Creating a Form
To create a form, create a file named forms.py in the application folder and add the following code:
The input_formats attribute is important—it ensures the data matches Google Calendar's required format.
cal/forms.py
from django import forms

class BookingForm(forms.Form):
    eventTitle = forms.CharField(label="Event", max_length=255, required=True)
    startDateTime = forms.DateTimeField(label="Start Date and Time", input_formats=['%Y/%m/%d %H:%M'], required=True)
    endDateTime = forms.DateTimeField(label="End Date and Time", input_formats=['%Y/%m/%d %H:%M'], required=True)
6. Creating a template file
Next, let's create a template.
In this template, the following three CDNs are added to the head section of base.html.
Be sure to include jQuery and jQuery DateTime Picker. Google font is optional.
Note: Django doesn't directly load JavaScript files with the include tag, so we're using a workaround by placing the JavaScript in an HTML file and including that. This workaround shouldn't be used in production.
templates/base.html
{% load static %}
<!doctype html>
<html lang="en">
<head>
    <meta charset="UTF-8">
    <meta name="viewport"
          content="width=device-width, user-scalable=no, initial-scale=1.0, maximum-scale=1.0, minimum-scale=1.0">
    <meta http-equiv="X-UA-Compatible" content="ie=edge">
       <link href="https://fonts.googleapis.com/css2?family=Roboto+Condensed:wght@300&display=swap" rel="stylesheet">
    <link rel="stylesheet" href="https://cdn.jsdelivr.net/npm/[email protected]/jquery.datetimepicker.css">
    <link rel="stylesheet" href="{% static 'css/custom-style.css' %}">
    <title>Document</title>
</head>
<body>
    {% block content %}
   {% endblock %}
    <script src="https://code.jquery.com/jquery-3.6.0.min.js" integrity="sha256-/xUj+3OJU5yExlq6GSYGSHk7tPXikynS7ogEvDej/m4=" crossorigin="anonymous"></script>
    <script src="https://cdn.jsdelivr.net/npm/[email protected]/build/jquery.datetimepicker.full.min.js"></script>
    {% include "cal/js_code.html" %}
</body>
</html>
Let's create a template for the form part. To do so, create a file named home.html in the cal folder, since the application name is cal.
templates/cal/home.html
{% extends 'base.html' %}
{% load widget_tweaks %}

{% block content %}
    <div class="picker">
        <form id="picker__confirm" class="picker__confirm" autocomplete="off" action="{% url 'cal:home' %}" method="POST">
           {% csrf_token %}
            <div class="picker__component">
                <p class="picker__label">Event name</p>
                {% render_field  form.eventTitle class+="picker__field" %}
            </div>
            <div class="picker__component">
                <p class="picker__label">Start Time</p>
                {% render_field  form.startDateTime class+="picker__field" %}
            </div>
            <div class="picker__component">
                <p class="picker__label">End Time</p>
                {% render_field  form.endDateTime class+="picker__field" %}
           </div>
            <input type="submit" value="Submit" class="picker__button">
        </form>
    </div>
{% endblock %}
Django automatically generates form field IDs using the pattern id_ + field name. For example, the startDateTime field would be identified as id_startDateTime, and the endDateTime field would be identified as id_endDateTime.
Therefore, implement datetimepicker as follows:
templates/cal/js_code.html
<script>
  $( function() {
    $( "#id_startDateTime" ).datetimepicker({});
    $( "#id_endDateTime" ).datetimepicker({});
  } );
</script>
At this point, you should see a screen that looks like the one below.

7. Writing Google API settings in `views.py`
Next, configure Google API settings. Add the following code to views.py:
For service_account_email, enter the email displayed on the Service accounts page of Google Cloud Platform.
Regarding credentials, place the JSON file you obtained from GCP in the root directory of your project. Therefore, only include the file name in the brackets.
For calendarId, enter the Calendar ID that you checked from your Google Calendar earlier.
views.py
from google.oauth2 import service_account

SCOPES = ["https://www.googleapis.com/auth/calendar"]

service_account_email = "*******************************"
credentials = service_account.Credentials.from_service_account_file('************.json')
scoped_credentials = credentials.with_scopes(SCOPES)
calendarId = "************************************"
8. Creating a POST Method in views.py
Now let's write the code to send the data to Google Calendar.
To do so, you'll need to create a build_service function and add the post and form_valid methods in HomeView, which inherits from FormView.
The form data is sent using the POST method from the template. The data is then validated, and form_valid processes the data.
For date and time data, if the end time is earlier than the start time, it doesn't make sense. Therefore, if the data doesn't meet the criteria, an error will be displayed using Django's message framework.
After this data validation, the data is sent to Google Calendar using event.execute(). While various parameters can be added to the body, we'll stick to the minimum necessary for this example.
To provide user feedback, display a success message after a successful POST. Therefore, we add the get_success_url method at the end of this class.
views.py
...
from django.contrib import messages
from django.http import HttpResponseRedirect
from django.urls import reverse
from googleapiclient.discovery import build
...

...

def build_service(request):

    service = build("calendar", "v3", credentials=scoped_credentials)
    return service

class HomeView(FormView):
    form_class = BookingForm
    template_name = 'cal/home.html'

    def post(self, request, *args, **kwargs):
        form = BookingForm(request.POST)
        if form.is_valid():
            return self.form_valid(form)
        else:
            return self.form_invalid(form)

    def form_valid(self, form):

        eventTitle = form.cleaned_data.get("eventTitle")
        start_date_data = form.cleaned_data.get("startDateTime")
        end_date_data = form.cleaned_data.get("endDateTime")

        if start_date_data > end_date_data:
            messages.add_message(self.request, messages.INFO, 'Please enter the correct period.')
            return HttpResponseRedirect(reverse("cal:home"))

        service = build_service(self.request)

        event = (
            service.events().insert(
                calendarId=calendarId,
                body={
                    "summary": eventTitle,
                    "start": {"dateTime": start_date_data.isoformat()},
                    "end": {"dateTime": end_date_data.isoformat()},
                },
            ).execute()
        )

        return super().form_valid(form)

    def get_success_url(self):

        messages.add_message(self.request, messages.INFO, 'Form submission success!!')

        return reverse('cal:home')
Add the following code to display this message in the template.
Place the accompanying code at the bottom of home.html.
templates/cal/home.html
{% extends 'base.html' %}
{% load widget_tweaks %}

{% block content %}

    ...

    <div class="display_message">
    {% if messages %}
        <ul class="messages">
            {% for message in messages %}
            <li  {% if message.tags %} class=" {{ message.tags }} " {% endif %}> {{ message }} </li>
            {% endfor %}
        </ul>
    {% endif %}
    </div>
{% endblock %}
9. Retrieving Data from Google Calendar
We've implemented sending form data to Google Calendar. Now we'll implement retrieving data from the Google API when the page loads and displaying it in the form.
First, retrieve the data from the Calendar API as a list, then remove the UTC time from the start and end times.
Next, return the form summary, event title, start time, and end time as context.
Add the following code to views.py:
views.py
...

class HomeView(FormView):
    form_class = BookingForm
    template_name = 'cal/home.html'

    ...

    def get_context_data(self, **kwargs):
        context = super(HomeView, self).get_context_data(**kwargs)
        form = BookingForm()
        booking_event = []
        service = build_service(self.request)
        events = (
            service.events().list(
                calendarId=calendarId,
            ).execute()
        )

        for event in events['items']:

            event_title = event['summary']

            # Deleted the last 6 characters (deleted UTC time)
            start_date_time = event["start"]["dateTime"]
            start_date_time = start_date_time[:-6]

            # Deleted the last 6 characters (deleted UTC time)
            end_date_time = event['end']["dateTime"]
            end_date_time = end_date_time[:-6]

            booking_event.append([event_title, start_date_time, end_date_time])

        context = {
            "form":form,
            "booking_event" : booking_event,
        }

        return context
Add the template code corresponding to the previous code. Place it at the top of the block content:
templates/cal/home.html
...

{% block content %}
    <h1 class="event_title">Booking Event List</h1>
    <div class="event">
        {% for item in booking_event %}
        <ul class="event__list">
            <li>Event title:{{ item.0 }}</li>
            <li>Start_date_time:{{ item.1 }}</li>
            <li>End_date_time:{{ item.2 }}</li>
        </ul>
        {% endfor %}
    </div>

    ...

{% endblock %}
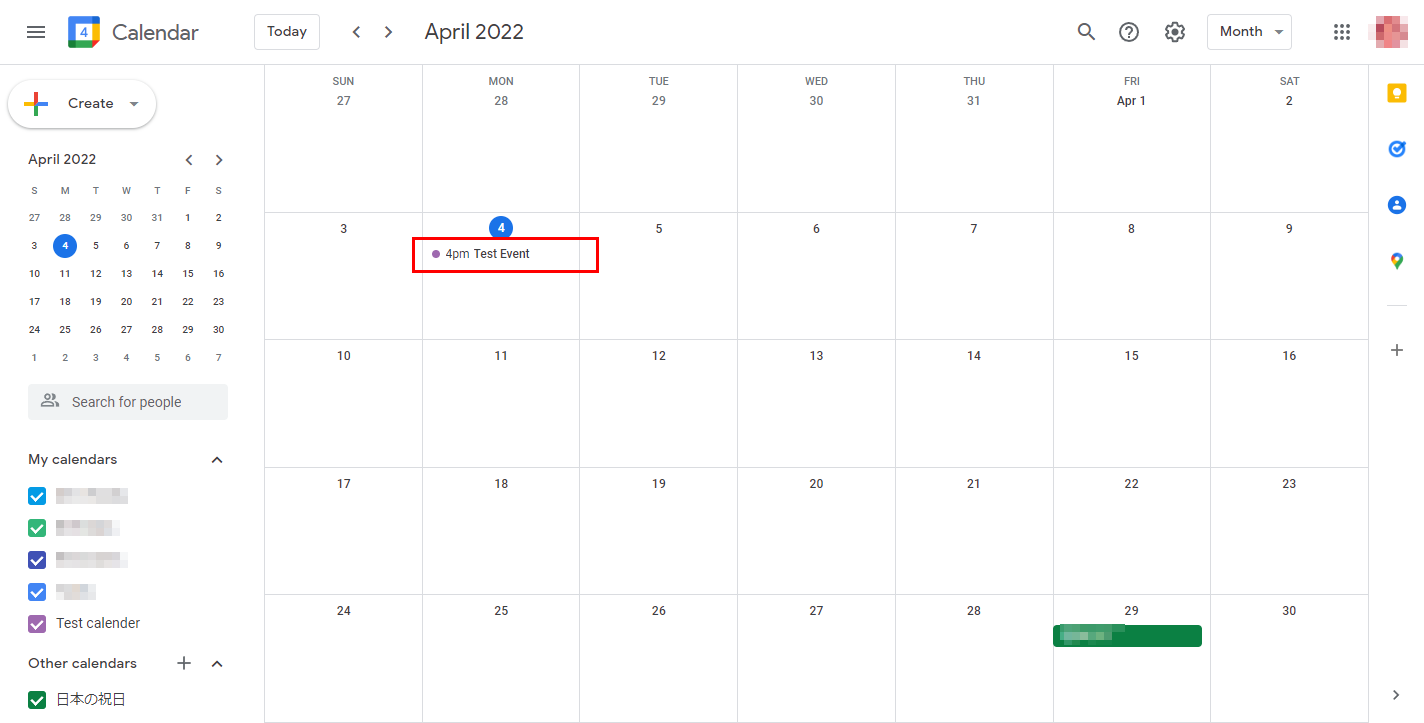
Now that the implementation is complete, let's run the application.
The screenshots below show the application with styling applied. CSS code is provided in the next section.

10. Customizing the Design with CSS
To use this design, add the following CSS:
custom-style.css
*{
    padding:0;
    margin:0;
    box-sizing:border-box;
}

:root{
    --main-font-family:'Roboto Condensed', sans-serif;
    --main-bg-color:#262626;
    --main-text-color:#1FC742;
    --main-border:5px solid #025B18;
}

body{
    font-family: var(--main-font-family);
    background-color: var(--main-bg-color);
    color: var(--main-text-color);
    max-width: 100%;
    min-height: 100vh;
}

ul {
  list-style-type: none;
}

.event_title{
    width: auto;
    height: 4rem;
    display: flex;
    justify-content: center;
    align-items: center;
}

.event{
    display: grid;
    grid-template-columns: repeat(4,  0.25fr);
    grid-gap: 1rem;
    margin: 1rem;
}

.event__list{
    padding: 1rem;
    border: var(--main-border);
    border-radius: 0.5rem;
}

.picker{
    width: auto;
    height: auto;
    margin: 1rem;
    display: flex;

    justify-content: center;
    align-items: center;
}

.picker__confirm{
    width: 25vw;
    display: grid;
    grid-template-rows:repeat(4, 1fr);
    grid-gap: 1rem;
}

.picker__field{
    height:2rem;
    width: 100%;
    padding: 0.5rem;
    color:var(--main-text-color);
    background-color: var(--main-bg-color);
    border: 2px solid #025B18;
}

.picker__field:focus{
    outline: 3px solid #025B18;
    caret-color: var(--main-text-color);
    color: var(--main-text-color);
}

.picker__button{
    background-color: var(--main-bg-color);
    border: var(--main-border);
    color: var(--main-text-color);
}

.picker__button:hover{
    cursor:pointer;
}

.display_message{
    display: flex;
    justify-content: center;
    align-items: center;
}
That's it!
Understanding Service Account authentication is the key to integrating Google APIs with Django. Once you grasp this concept, you can integrate many Google services—Calendar, Drive, Gmail, and more—into your Django applications.
The complete implementation is available in this repository. Use it in your own projects!