
This article will guide you through building a simple contact form using Django and SendGrid.
When running a web service or blog, implementing an email delivery system is often necessary. However, building such a system from scratch is not easy and involves many challenges.
I once built and operated a service that combined Django and Gmail to deliver emails. However, even though I believed the settings were correct, emails often failed to deliver as expected.
When I faced this problem, SendGrid became my solution.
As a cloud-based email delivery system, it is easy to set up, and in my experience, email delivery problems rarely occur when using SendGrid.
Furthermore, SendGrid integrates easily with your existing web application. It is one of the most popular email delivery services among web developers.
In this article, I will show you how to use SendGrid in Django to easily send emails through a contact form.
About SendGrid's Free Tier
SendGrid offers both free and paid plans. The free plan is limited to sending 100 emails per day.
While the free and paid plans have some additional differences beyond email volume, the free tier should be sufficient for testing purposes.
Two Ways to Integrate SendGrid into Django
There are two primary ways to integrate SendGrid with Django: using an SMTP server or leveraging the Web API. Most online tutorials covering Django and SendGrid tend to focus on the SMTP solution.
However, SMTP has some drawbacks that make it less suitable for modern web applications. It can be slower than the Web API and offers limited error messages, making debugging more difficult. Therefore, if you're integrating email functionality into your Django project, I recommend building your system around the Web API.
This article will demonstrate how to send emails using SendGrid's Web API through the django-sendgrid-v5 package, which integrates with Django's built-in email functions.
This approach is the easiest way to use SendGrid with Django while establishing a foundation for a scalable and robust email delivery system.
Environment for application development
After creating a basic Django application, we'll integrate SendGrid. The process of creating a basic Django application won't be covered here.
If you're using Docker, please refer to this article to set up a basic Django application within a Docker container.
Application Overview
We'll create an application that displays a simple form and sends an email to the site owner when valid input is submitted.
To keep things simple and focus on SendGrid integration, we'll only create a form, template, and corresponding view. We will not create a Model.
We'll use the following package to send email via the Web API.
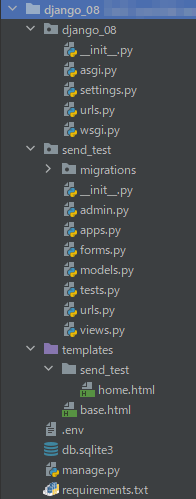
Project file structure
The project is named "django_08", and the app is named "send_test".
When using SendGrid, an API key is required. This key should be written in the .env file, which will be described later.
Implementation Process
The process might involve some back and forth, but generally, it follows these steps:
- Setup of SendGrid
- Install the package
- Setup of settings.py
- Set up urls.py in the Django root folder and create urls.py in the application folder
- Create a forms.py
- Create Templates
- Create a views.py
1. Setting up SendGrid
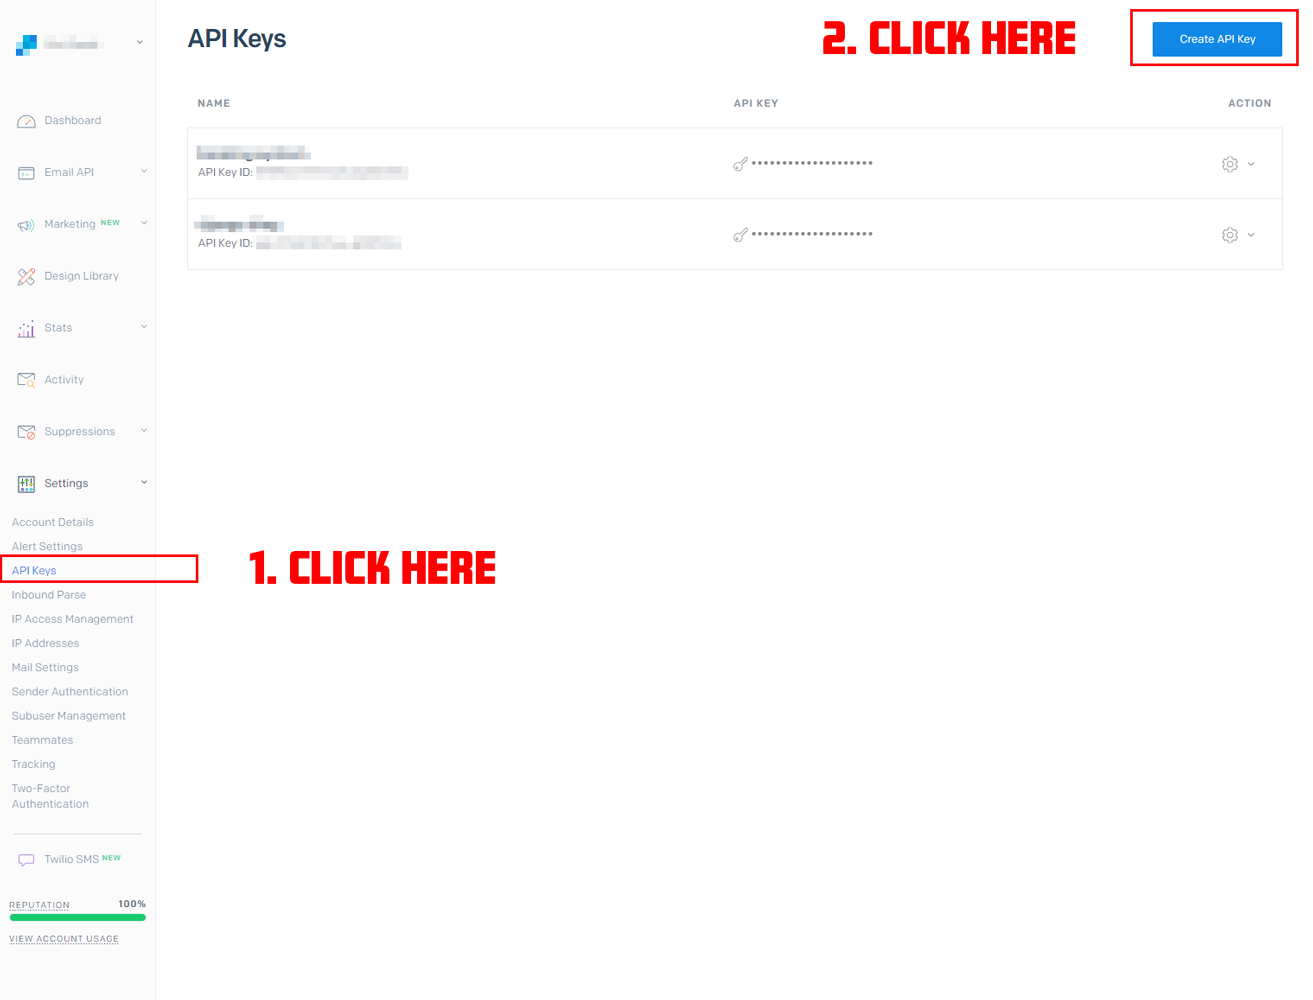
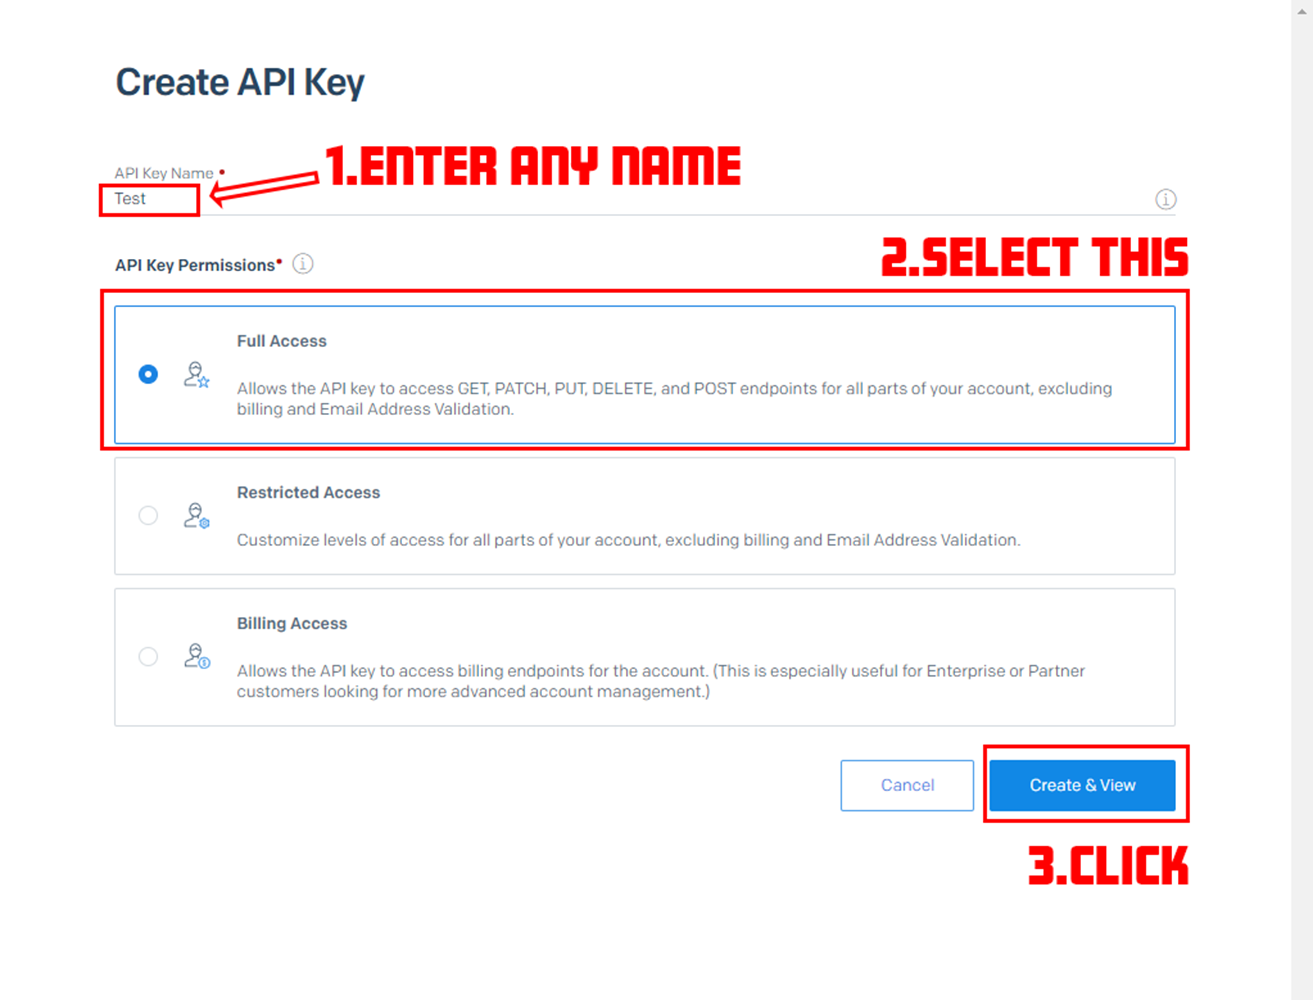
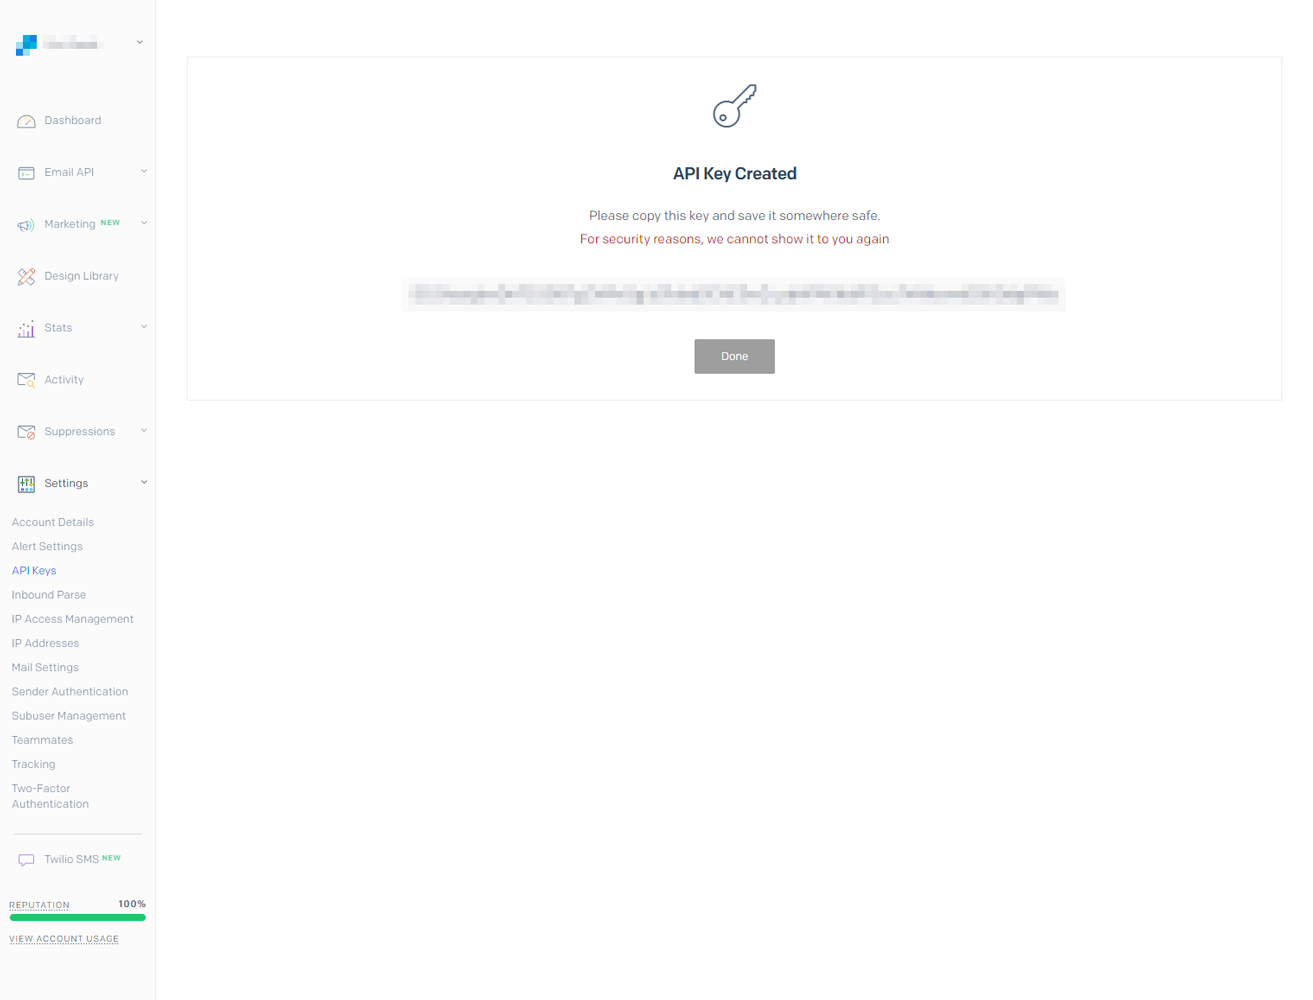
To start, go to the SendGrid website and obtain an API key.
The process of obtaining an API key has been covered in various tutorials, so I'll just show you a screenshot of the page to get it in this blog. It can be found in the settings at the bottom of the sidebar navigation.
2. Installing the Package
Please install the following packages, assuming that the basic package for running Django and Django itself have already been installed.
django-environ
django-sendgrid-v5
3. settings.py
Add the following code in settings.py to use the web API in a local environment.
Setting SENDGRID_SANDBOX_MODE_IN_DEBUG to False ensures that emails are actually sent to the designated email address even during development, rather than being blocked by sandbox mode. I prefer this approach as it's more practical.
EMAIL_BACKEND = "sendgrid_backend.SendgridBackend"
SENDGRID_API_KEY = os.getenv('SENDGRID_API_KEY')
SENDGRID_SANDBOX_MODE_IN_DEBUG=False
Additionally, create an .env file and enter the value of the SendGrid API_KEY.
.env file
SENDGRID_API_KEY=xxxxxxxxxxxxxxxxxxxxxxxxxxxxxxxxxxxxxxxxxxxxxxxxxxxxxxxxxx
4. urls.py
Create two files: urls.py in the Django root directory and urls.py in the application folder.
urls.py in the project:
from django.contrib import admin
from django.urls import path, include

urlpatterns = [
    path('admin/', admin.site.urls),
    path('', include('send_test.urls', namespace='send_app')),
]
urls.py in application:
Note: You may see an error for from send_test import views at this point, but you can ignore it for now.
urls.py in application:
from django.urls import path
from send_test import views

app_name = 'send_app'

urlpatterns = [
    path('', views.home, name='send_test'),
]
Only include very basic content in the view. Write the code as shown below.
views.py
from django.shortcuts import render

def home(request):
    return render(request, 'send_test/home.html')
5. forms.py
Create a form as follows. Create a forms.py file inside your application directory.
forms.py
from django import forms

class SendForm(forms.Form):
    email = forms.EmailField(label="Email", max_length=100)
    content = forms.CharField(label="Content", max_length=200)
6. Templates
Next, let's create the template files. Refer to the previously mentioned file structure and create base.html and home.html.
base.html
<!doctype html>
<html lang="en">
<head>
    <meta charset="UTF-8">
    <meta name="viewport"
          content="width=device-width, user-scalable=no, initial-scale=1.0, maximum-scale=1.0, minimum-scale=1.0">
    <meta http-equiv="X-UA-Compatible" content="ie=edge">
    <title>Document</title>
</head>
<body>
    {% block content %}{% endblock %}
</body>
</html>
home.html
{% extends 'base.html' %}

{% block content %}
    <h1>SendGrid Test App</h1>
    <form id="TestForm" method="post" action="{% url 'send_app:send_test' %}">
        {% csrf_token %}
        {{ form.as_p }}
        <button type="submit" value="Test">send message</button>
    </form>
{% endblock %}
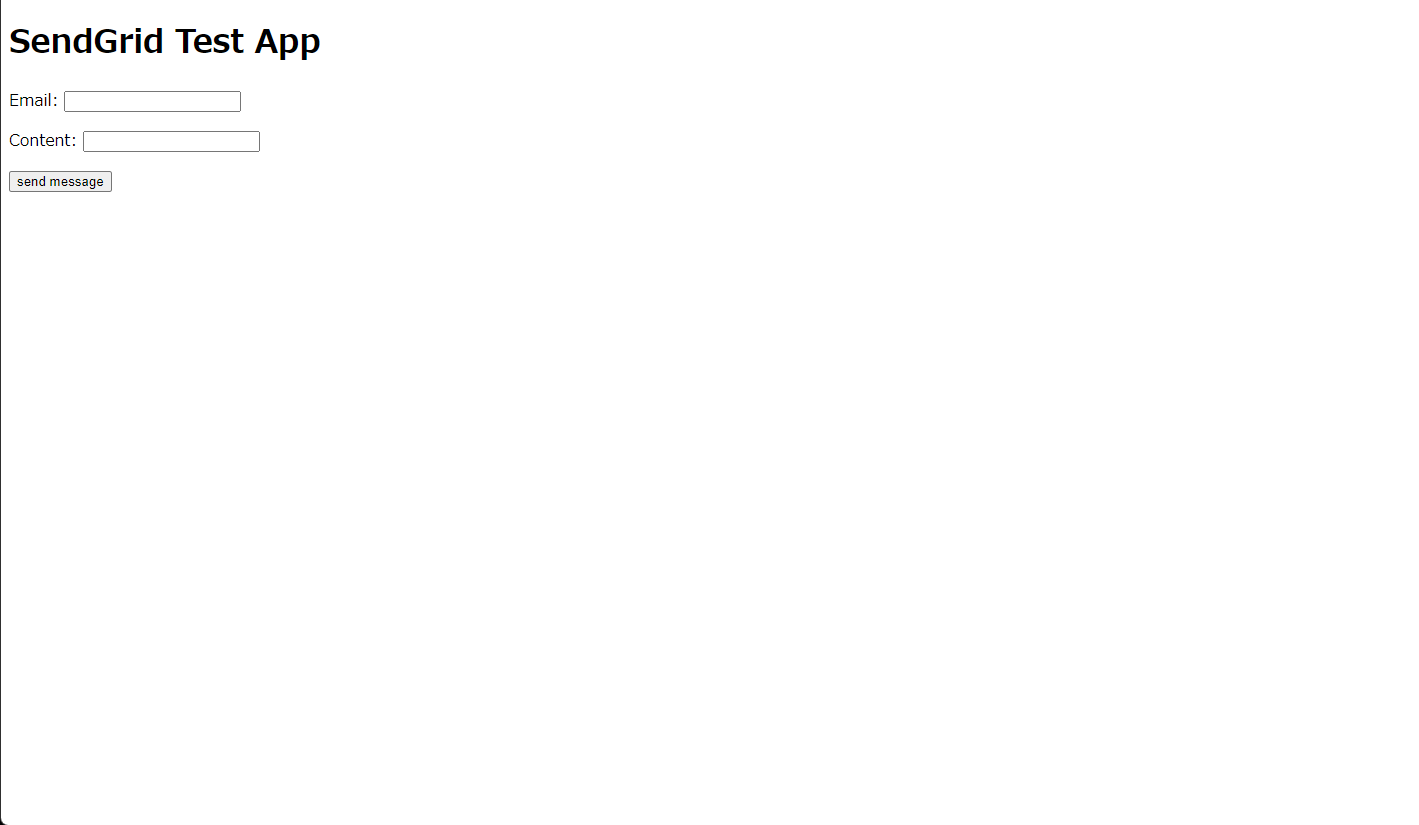
http://127.0.0.1:8000/ (the URL and port may differ depending on the environment). When you access it, the following will be displayed:
7. views.py
This section is the most important part of this tutorial.
Within the try block in this view, we call the send_mail function, which sends an email using SendGrid after validating the submitted data.
This single line of code is all you need to send an email.
The rest is handled by django-sendgrid-v5.
In the send_mail function, note that the fourth argument specifies the recipient's email address.
To avoid hardcoding email addresses in your code, store the recipient's address in an environment variable. Then use recipients = os.getenv('TO_EMAIL'), replacing TO_EMAIL with your chosen variable name.
import os
from django.http import HttpResponse
from django.shortcuts import render

from .forms import SendForm
from django.core.mail import send_mail, BadHeaderError

def home(request):
    if request.method == "POST":
        form = SendForm(request.POST)
        if form.is_valid():
            subject = 'Message from TestAccount'
            message = form.cleaned_data['content']
            sender = form.cleaned_data['email']
            recipients = os.getenv('TO_EMAIL')
            try:
                send_mail(subject, message, sender, [recipients], fail_silently=False)
                return HttpResponse('Successfully sent a message!')
            except BadHeaderError:
                return HttpResponse('Error!')
    else:
        form = SendForm()
    return render(request, 'send_test/home.html', {'form':form })
.env
That's all! With SendGrid, you can create a reliable email delivery environment with a simple setup and code, as shown above. There's no reason not to use it, so let's all start using it actively.
I've also created a GitHub repository for this application, which you can access here.
Happy coding!